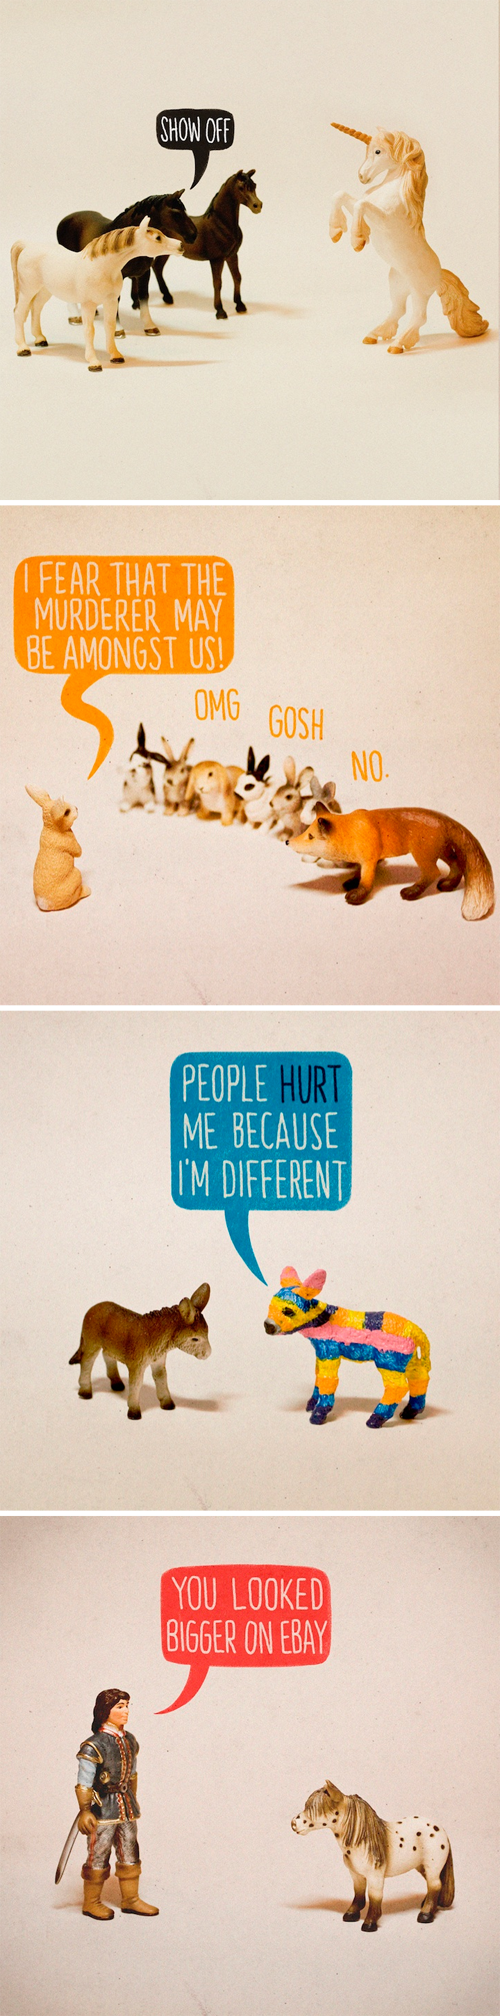
There are a lot of designers out there doing the ‘make something everyday’ thing. Unlike most however, Aled appears to be doing it well. These definitely got a chuckle out of me.
– Christian
There are a lot of designers out there doing the ‘make something everyday’ thing. Unlike most however, Aled appears to be doing it well. These definitely got a chuckle out of me.
– Christian


These gloves were supposed to be a Christmas gift for my sister last year, but she didn’t receive them until this year. It’s not that I’m a slow knitter it’s just that I go through phases of wanting to knit. I added the final touch last night, the little heart buttons on the cuff. Aren’t they the cutest gloves you’ve ever seen! I’m so happy with the final product. If you’re interested in making these, it’s a pattern from the Fall/Winter 2008 knit.1 magazine called Rainy Day fingerless gloves.


My second project is this cute little cardboard cat house that I made while watching the Golden Globes. Basically I had been really wanting to buy my kitties a cardboard house or teepee from Loyal Luxe, but decided not to spend the money and just make one myself. I took a regular box and spray painted the inside hot pink and adjusted the flaps to make the roof. I left the sides of the roof open so then can jump in and out that way, if they please. The chimney was made with some of the leftover cardboard and the shingles with scrap paper I had around the house. The kitties love it (that’s Jesse James in the photo above) and it much better on the eyes in comparison to the regular old box I had left out for them.
Enjoy your weekend!
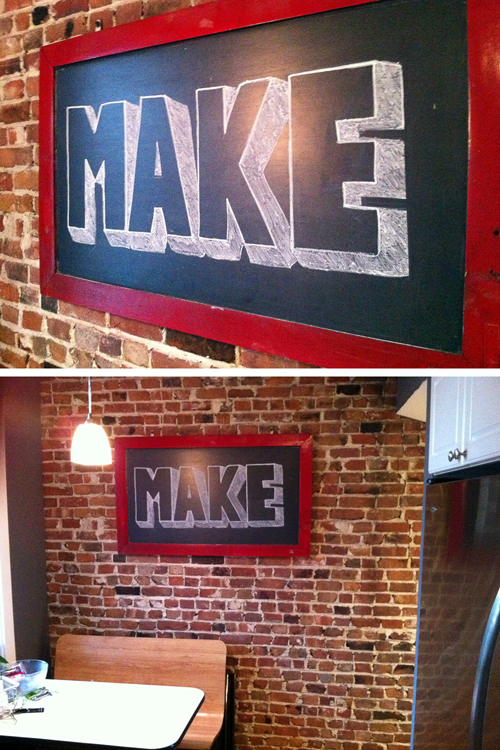
This past week I happened to find myself in an old abandonded fire station. Within it, I came across an old slate chalkboard. It was heavy, a bit ricketty, and fire engine red. I loved it immediately. More importantly, I knew right away what I had in store for it.
I’ll be the first to admit that I did draw inspiration from one of my absolute favorite design shops,…the things makers from Portland, Oregon….Official Manufacturing Co.
– Christian


I’ve been wanting to make a vintage suitcase pet bed ever since seeing this post on modern cat. It took me a while to find the right suitcase, but other than that it was a very simple and quick assembly which only took me a couple hours in front of the tv to make the base and then a quick half an hour at the sewing machine to make the cushion. My cats seem to like it and regardless I think it looks nice even if they decide that they don’t want to use it. My cat Annie Oakley is the one featured above.
Supplies:
• Vintage Suitcase
• 5″ Round Taper Table Legs (4 total)
• Angle Top Plate (4 total)
• Additional screws (The screws that came with the angle top plate were too long and poking through the suitcase, so I had to get shorter screws at the hardware store.)
• Craft glue
• Paint and paintbrush
• fabric and fill
• tools: screwdriver, hammer
1. To start I separated the lid from the base of the suitcase by removing the pin from the hinges. I used a hammer and nail to force the pin out and then removed it the rest of the way with pliers.
2. Carefully cut the fabric that connects the lid to the base of the suitcase and fold it down into the base. I used craft glue to keep the extra fabric in place.
3. Next I attached the angle plates to the bottom of the suitcase, one in each corner. Like I mentioned in the supplies, the screws that came with the plates were too long so I had to get much shorter ones at the hardware store. The legs screw right into the base.

4. I painted the legs to match my fabric and then screwed them into the plates to dry. 2 coats total and I taped off the brass on the legs for a clean edge.
5. I made a simple custom cushion, but in hindsight I think I could’ve purchased a regular pillow and made a case for it.
I’m really happy with the results. I love having a unique pet bed that is also eco-friendly. Hopefully my cats enjoy it too!
I want to apologize for my recent disappearance. There have been lots of changes in my life that have been emotionally draining me, (more so than I even realized until recently.) Work has gotten crazy, my best friend moved to Boston, I’m looking for a new roommate—it’s all wearing me out. My solution has been getting lost in a lot of projects.
One of my first projects has been updating my living room, I have been looking at living room furniture sets for a while now . It’s a rental so there are a few things that I just can’t change, (like the awful brown carpet, which I wish I could replace with something from NW Rugs) But I am making the best of what I’ve got. It’s still a big work in progress, but I’m already loving the start.
before:

Changes that I made so far: I painted the red wall back to white. (The 3 coats that it took to cover the red practically crippled my hand.) And I painted the opposite wall BEHR Jamaican Blue. One of the chairs was removed to open up the space. A new, slightly smaller ottoman was purchased and recovered in magenta Joel Dewberry woodgrain fabric. And I switched out the accent lamps. I also got my hands on sound dampening curtains so that I could pump up the volume of my stereo while not disturbing my neighbours’ peaceful life.
after:


I couldn’t be happier with the color. It seems to make the room so much brighter and cleaner looking. I still have plenty to do though. I want to get some curtains for the room and need artwork for the white wall—it’s completely bare right now, but I’m thinking a whole bunch of colorful pieces displayed salon style. New throw pillows are a must. And the biggest thing, I need a new tv stand. I’m leaning towards this one at CB2 but I am open to anything, so please share if you have any suggestions. I’ll keep you posted on the progress!


Over the weekend I picked up a cardboard deer trophy on clearance at Urban Outfitters. (These aren’t available on the UO site, but they are available here plus they have rhinos and buffalo.) Anyway, I purchased the deer trophy thinking I could personalize it to make it more original and of course fancier. I modpodged newspaper on one side of the cardboard and painted the other side a robin’s egg blue. This process actually took a few days. The most time consuming part was triming the newspaper around the pieces because I wanted to still be able to see the corragated edges. For the actual trophy plaque I attached wood veneer and stained it. I love the way Bucky turned out—very graphic and bold with the subtle blue touches. Now I am trying to decide if I need the rhino to accompany Bucky on the wall.

This image above is proof that you can make the best out of the space that you have. Currently I am lucky enough to a whole room devoted to my crafts but it’s definitely not as beautiful as this little office. One of the my goals for the summer is to reorganize my craft room to make it chic and completely functional. Here is a great resource from ReadyMade to help you make the most out of your space.
image via here
found via The Pedal Pusher
I am in love with using yarn pom poms as bows on all my gifts this year. It’s a great way to use leftover yarn and gives the gifts a unique and raw flair.
p.s. If you have kitties its best to make these when they aren’t around. My two little ones couldn’t resist constantly attacking and playing with them.

yarn pom pom tutorials here or here
plastic bag pom pom tutorial here
images via flickr and domestifluff